
Select Language: 


Antes de poder entrar al juego, necesitas descargarte el cliente completo Cliente Completo Helbreath. Es un archivo Autoinstalable, ejecutalo y sigue las instrucciones y podras Jugar.
Ahora llegamos a la parte donde deberiamos crearnos una cuenta para poder jugar crear la cuenta. Podes ver el link para crear una cuenta en la parte de arriba a la izquierda de la pagina con el nombre "Mi Cuenta". Cuando crees la cuenta necesitas una cuenta de E-mail valida. Cuando hayas leido las reglas, y hayas aceptado los términos. Antes de poder administrar tu cuenta es necesario activarla por E-mail. Un mensaje de validación va a ser enviada a tu dirección de E-mail. Una vez activada la cuenta ya puedes ingresar al juego y empezar a jugar.
Para empezar el juego necesitamos usar el actualizador (usando Helbreath.exe), o empezando Helbreath directamente (usando HelGame.exe). Use el actualizador si hay algún cambio dentro del juego, y necesita descargar los nuevos archivos para el juego. Si no puede usar el HelGame.exe como es de costumbre.
Ahora estamos llegando a la parte divertida del juego!, dentro del mismo. Ya tenemos una cuenta de echo que no necesitamos crear una nueva.
Necesita iniciar sesión con la cuenta que acaba de crearse.
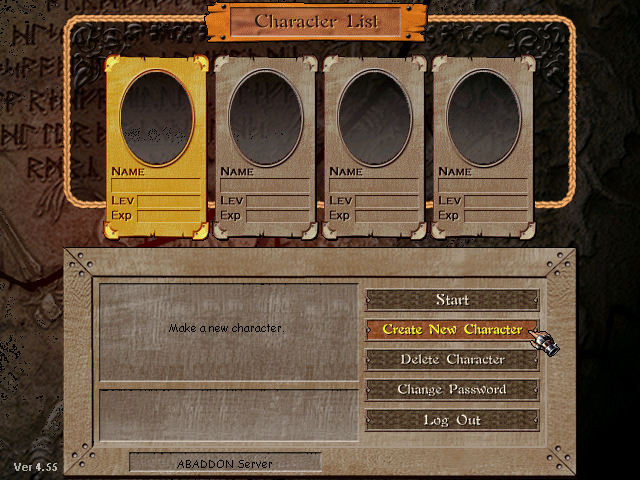
Una vez que haya ingresado con su cuenta en Helbreath, su Firewall(Cortafuegos) podría aparecer en alerta. Ahí debería permitir el acceso de Helbreath al Internet (en otro caso no podría jugar). Puede crear 4 personajes por cada cuenta. Es libre de crearse la cantidad de cuentas que desee, mientras que sus cuentas de correo sean validas.
Haga un click en "Create New Character" para crear tu primer personaje.
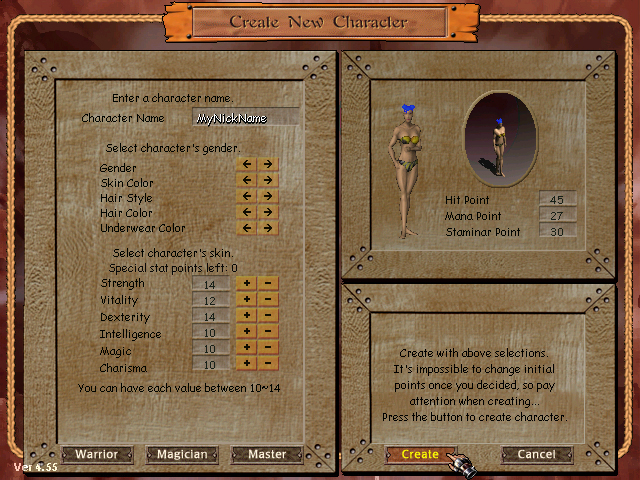
Al empezar tenes 10 puntos para asignar a los stats del personaje. Podes cambiar el sexo, el tipo de peinado, el color del pelo, el color de la ropa interior y el color de tez. En la parte inferior de la pantalla hay algunos tipos de personajes que puede elegir.
Si clickea en alguno de ellos, va a decidir los stats del personaje por vos, adecuado para el estilo de juego que desee. STATS DEFINIDOS / TIPOS DE CLASES
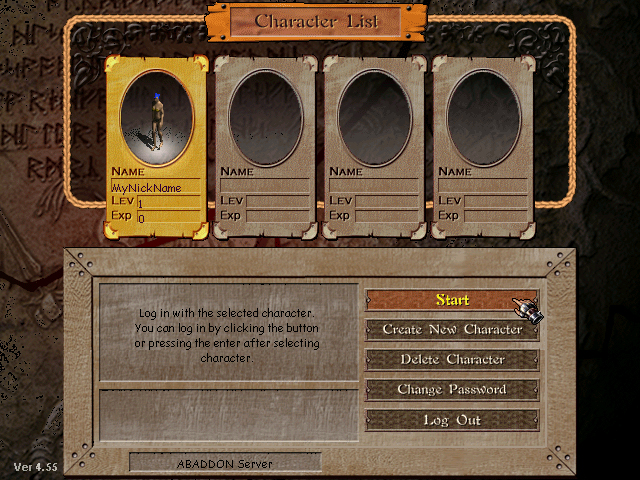
Una vez terminado de modificar las estadísticas de nuestro personaje, vamos a intentar crearlo. Alguna veces el nombre del personaje esta en uso, y debes intentar otro nombre. Cuando el jugador es creado vuelve a la pantalla de selección de personajes.
Todo lo debe hacer ahora es hacer doble click sobre nuestro nuevo personaje para jugar!
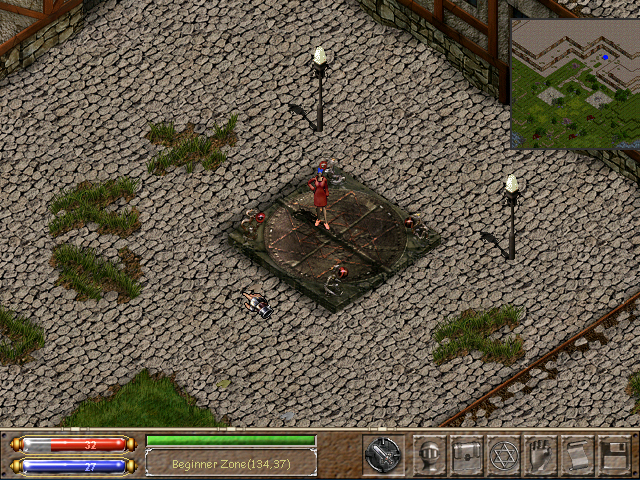
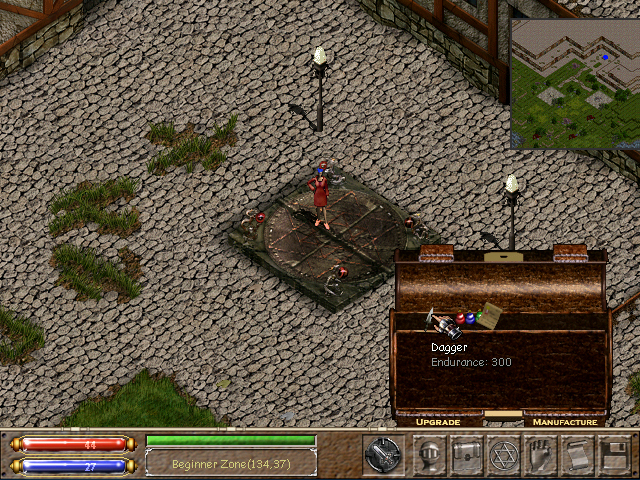
Finalmente estamos dentro del juego, y vamos a entrenar nuestro personaje al nivel mas alto. Usted empieza en la zona de principiantes (Beginner Zone) con algunas ropas, algunas pociones, un papiro(Scroll) y un arma. Usted empieza con nivel 1 en el personaje, y puede llegar hasta el nivel 180. Puede aumentar y ir llegando al nivel mas alto mientras mata las criaturas que vera en el juego.
En su valija tiene una Revitalizing Potion(Poción Revitalizante), Health Potions(Poción Salud) y una Mana Potion(Poción Mana). Usted tiene una Daga(Dagger), y un Recall Scroll(Papiro de Regreso). Equipese la Daga para atacar algo. De otra manera puede usar sus manos para atacar, que no es demasiado efectivo.
Puede quedarse en la zona de principiantes hasta el nivel 19, luego recibirá un mensaje en la parte inferior de la pantalla. You have to join a city before you can raise more levels.(Debe unirse a una ciudad antes para poder seguir subiendo niveles). Puede elegir entre Aresden o Elvine.
| Tecla | Acción |
|---|---|
| Tab | Cambiar a modo Ataque/Paz. |
| Home | Cambiar al modo seguro. Cuando se encuentra en modo de seguro(safe mode) no pude atacar/lastimar criaturas aliadas o a otros personajes. |
| End | Repetir ultimo mensaje utilizado. |
| Insert | Tomarse una big red potion"Pocion grande de salud"(si se dispone de una) / tomarse una small red potion"Pocion pequeña"(salud). |
| Delete | Tomarse una big blue potion"Pocion grande de mana"(si se dispone de una) / tomarse una small blue potion"Pocion pequeña"(mana). |
| PgUp | Usar habilidades especiales. Algunos items le brindan habilidades especiales, apreté PgUp para usarla. |
| PrintScrn | Guarde una toma de la pantalla en la carpeta de Helbreath, HelShotXX.bmp |
| F1 | Abre una ventana de ayuda. |
| CTRL+F2 | Asignar una acción rapida. Equipar un arma o castear un hechizo, cuando apréte CTRL+F2 dispone la tecla F2 para realizar la ultima acción. |
| CTRL+F3 | Asignar una acción rapida. Equipar un arma o castear un hechizo, cuando apréte CTRL+F3 dispone la tecla F3 para realizar la ultima acción. |
| F2 | Ejecuta acción rapida. |
| F3 | Ejecuta acción rapida. |
| F4 | Ejecuta ultima acción realizada. |
| F5 | Muestra las estadísticas(Stats) del jugador. |
| F6 | Abre el inventario(valija). |
| F7 | Abre la pantalla de hechizos. |
| F8 | Abre la pantalla de habilidades(Skill). |
| F9 | Muestra el historial de conversación. |
| F11 | Cambia las pantallas a un modo semi-transparente. |
| F12 | Muestra opciones del sistema. |
| Shift+Control+mouse | Ataque DASH. (Dash* demostración de ataque) |
| Alt+Mouse | Ataque especial . Una vez obtiene 100% de habilidad(Skill) sobre un arma, puede utilizar el ataque especial para esa arma. |
| CTRL+MOUSE | Ataque forzado. |
| CTRL+T | Asignar el modo de susurro(Wisp/whisper) con el jugador marcado mediante el cursor del mouse. |
| CTRL+S | Sonido on / off |
| CTRL+M | Abrir un mini mapa si esta habilitado. |
| CTRL+D | Cambiar la calidad de imagen. LOW/MEDIUM/HIGH (BAJO/MEDIO/ALTO) Detalles de definición. |
| CTRL+1, CTRL+2 | Acceso rapido a los círculos de magia. |
| Alt + Left Mouse | Cuando la habilidad de las armas es del 100%, se puede hacer un ataque crítico. |
| Control+R | Activa correr automáticamente. |
| Shift | Le permite correr cuando se pulsa el botón Shift. |
| ALT+F4 | Comienza el proceso de deslogueo. El daño que se produzca mientras esta el conteo cancela la acción. |
| Tecla de inicio para chat (debe incluirse delante del texto) | Acción |
|---|---|
| ! | Chat general (para que todos puedan leer tu mensajes). |
| ~ | Chat ciudad (solo los de tu ciudad podr�n leerte). |
| @ | Chat clan (para hablar con los de tu clan). |
| $ | Chat party (para usarlo con el equipo de amigos de combate). |
| Escribir en ventana de chat | Acción |
|---|---|
| /to "Nick" | Para entrar en modo Wisp/Wispear susurrar a un compa�ero (Sin comillas). |
| /who | Para ver los usuario online (conectados) en el momento. |
| /showframes | Muestra tus fps. |
| /showtime | Muestra un segundero. |
| /checkrep | Muestra tu reputación. |
| /rep+ Name | Da reputación positiva a otro jugador, y se suma a su cuenta la reputación. |
| /rep- Name | Da reputación negativa a otro jugador, y se resta a su cuenta la reputación. |
| /hold | Cuando haya Sumoneado(creado) un monstruo, si se han creado por un hechizo, poción, o monstruos de la Crusade(Crusada)(Guild Master solamente) puede hacer que los monstruos se detengan en el lugar sin que lo sigan. |
| /tgt Name | Da el comando a un monstruo Sumoneado(creado) por usted mismo, que busque y ataque a la persona que se indico.(Solo enemigo) |
| /free | Libera al mounstruo y le permite que vuelva a seguir a su creador. |
| /setpf | Permite definir un mensaje personal que se puede ver si alguien utiliza el comando /pf en usted. |
| /pf Name | Te permite ver si la persona se encuentra en el mismo mapa que usted. Mostrara su mensaje personal de ser así. |
 Follow @hbnemesis